 In our sports hall we have the opportunity to fly with model airplanes. Last year, I saw the Magnum Reloaded flying. The pilot was very enthusiastic about the plane. Long story short, I decided to build one myself. Browsing the internet, I found many Magnum’s but not clear building instructions. It’s not a difficult plane to build. I will try to document the buying and building process.I already have a transmitter.
OrangeRx T-SIX 2.4GHz DSM2 6CH Programmable Transmitter w/10 Model Memory (Mode 1) bought from HobbyKing (www.hobbyking.com)
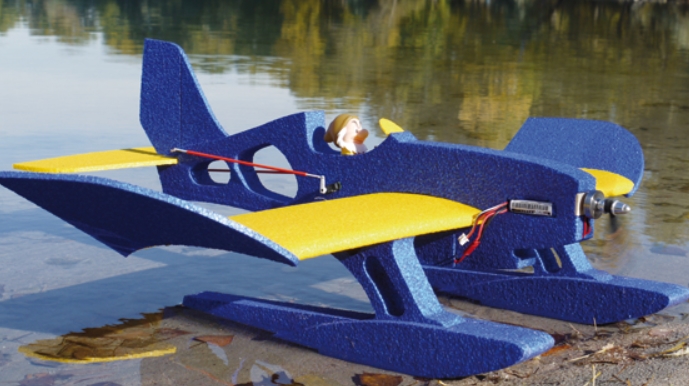
I bought the plane itself from our Dutch ebay called Marktplaats. Everything pre-cut EPP with floaters. It took me €31,75 and was delivered within 2 days.
Next step was a time consuming order with HobbyKing. I chose only parts available in their warehouse in Europe.
- Engine: Turnigy Park250 Brushless Outrunner 1680kv (EU Warehouse): $11
- Speedcontroler: HobbyKing 10A ESC 1A UBEC (EU warehouse): $7.33
- Servo: 2x HXT500 6.2g / 0.6kg / .08sec Micro Servo (EU Warehouse): $3.75
- Battery: ZIPPY Flightmax 800mAh 2S1P 20C (EU warehouse): $4.99
- Prop: Slow Fly Electric Prop 8045SF (4 pc) (EU warehouse): $2.42
- Receiver: OrangeRx R615 Spektrum/JR DSM2 Compatible 6Ch 2.4Ghz Receiver (EU warehouse: $6.99
I needed glue. I read a lot about all kinds of glue and decided to go for superglue or CA glue with an activator. Not all superglues do well with EPS or EPP. http://www.rcracingtwente.nl/ offered the stuff I needed. I also ordered 2 pieces of Carbon rod for reinforcement.
- Zap Adhesives Zap-O Odorless CA+ Foam Safe Glue 20 gram: €9,95
- Zap Adhesives Zip Kicker (activator): € 7,95
- ZAP-A-GAP PT-03 Medium CA 14.1gram: € 4,95
- Carbon vezel staaf massief 0,8XMMX1000MM: € 2,50
- Carbon vezel staaf massief 1,5MMX1000MM: : € 2,30
The glue was expensive but I didn’t want to take a risk with the EPP. The activator and glue are from the same company and foam safe, so I figured they work well together. And taking delivery costs (€ 3,00) into account, it was not a bad deal.
Once again, I surfed to www.hobbyking.com. More stuff was needed. Some hinging tape although I read about hinges made out of contact glue. Control horns, nylon clevis and a balance charger for the lipo batteries.
- 1x 1″ x 4m Roll – 3M Blenderm Tape (Hinging Tape – Twin Pack) (EU warehouse): $4.46
- 1x Control Horns 13.5x16mm (10pcs) (EU warehouse): $1.16
- 1x Nylon Clevis 2x29mm (10pcs) (EU warehouse): $0.75
- 1x #TE4/30032 HobbyKing E4 Balance Charger (EU warehouse): $13.53
And after that, I couldn’t resist ordering some magnets. I don’t exacly know which size works best so I ordered to kinds with Deal Extreme. THe plan is to use magnets to mount the mainwing
- Model Small Magnets – Silver (50 PCS-Pack): $4,69
- 6 x 1mm Round N33 NdFeB Magnet – Silver (10 PCS): $2,27
Last order from www.ebay.com were some plugs for the battery connection in the plain as well as the charger.
- 20x 100mm lipo Battery plug JST connector Male & Female: $8,20
I used Acryl paint which I already had in stock. (from the dutch shop Action)
I will use the acronym MR for Magnum Reloaded in the next posts.
Any progress since the last post? I am also building a Magnum – although I’ve decided on the Acro version. I’ll be using either UHU Por, or (preferably) Foam-tac glue for most of the bonding jobs. Plus a bit of epoxy and some CA as well where needed.
Looking forward to the rest of your build.
Duncan
Sorry for the very (extremely) late reaction. The Magnum is ready since a couples of years. Maybe I post the rest of the build since I took the photo’s.